Sunday, September 14, 2014

Wall of Large DIY "Photo Canvases"

My daughter-in-law saw this photo on Pinterest (from melangephotographyblog.com) and thought it would be the perfect look for her new office at church. It became our inspiration.


I already had the perfect table to serve as her desk, and I'll tell you more about that in another post. Today I'll focus on the wall of photos. An entire wall of actual photo canvases are quite pricey and out of the question for our budget on this project. So . . . we checked out some DIY options online and settled on a super-economical way to pull off the look. The whole wall needed to cost less than $100.

Step 1: Decide on size of the entire grouping, and choose the size of each photo. 
- Photos need to be high quality in order to make them this large. Most of the photos Carey chose were taken in a photo shoot with a nice camera. (Largest was 5616 x 3744 - 6.8 MB. The smallest was 604 x 403 - 26 KB, and still worked out ok. It had a bit more "blurry, painterly look" to it, though, which I liked) Chloe Heckman took most of the photos. Aren't they GREAT?!?

- We decided the center photos would be about 24"x36" and the outer squares would be about 24"x24". We used a grid like this and made a mock-up, cropping the photos she chose:


Step 2: Have your photos printed
- At this size, even large photo posters would have been more than our budget would allow, so we decided to give it a try using engineer prints from Staples. You have to be ok with some a bit of a "shabby chic" look - with some lines or streaks - not a "perfect glossy photo." But run a test print to make sure the it's a look you like - and printers can vary, so if it comes out too streaky you could try a different Staples. Also be aware that the paper is quite thin - like regular copy paper.

- The three middle photos were 2'x3' and cost only $3.89 each. A 3'x4' print was $7.79, so I used Photoshop to put two of the 2'x'2' photos into one jpg. (I created an 18"x24" file that was 300dpi so it was in proportion for the 3'x4' print. They may be able to help you with that at Staples, or you might want to just stick to standard sizes) With a $10 off coupon, the prints came to only $22.00! But be sure to remember that there are other things to purchase to complete your project - and they add up!


- Be sure to make the photo about an inch or so bigger than the foam board you will mount it on so you can fold the print over the top edges.

Step 3: Purchase and prepare mounting materials
- I purchased and sprayed my photos with 2 cans of Design Master Clear Finish - Matte. (Micheals - on both the front and the back - just to protect them a bit and to help the the adhesive not seep through. You could try skipping this step - might turn out fine but I did not want to take any chances. The spray also deepened the color just a tiny bit.

- I purchased Scotch Photo Mount spray adhesive. I've used other spray adhesives in the past, but I whose this one for this project because I didn't want to take a chance on the adhesive discoloring if it seeped through at some point. Note: If you do not choose to prime the foam board before applying, be sure to purchase an adhesive that is mad for styrofoam - or it will dissolve it!

- I also purchased black Gorilla (Duct) Tape to put around the edges for the "Canvas look"

- We found two 2" thick 4'x8' foam insulation boards at church that had been used for a set in the children's department. That saved us about $27 each. I rolled on a coat of white primer because the paper was so thin I did not want the magenta paint they had used color to bleed through.


- My friend, Kurt used his table saw to cut the foam board for me. We  decided to cut them as 22.5" squares and 22.5"x34.5" rectangles so I had enough wiggle room as I glued them.


Step 4: Mount the photos on foam board
- Make sure the foam board is smaller than the photo so you can fold it over the top

- Lay the photo face down on a clean table top

- Take the foam board outside and spray a 1" line of adhesive along the top on one side only


-Carefully line up the foam board 1/2" away from the edge of the photo.
- Lightly fold back the photo to expose the rest of the foam board; spray the rest of the board. (Again, be sure to do that outside, away from anything you do not want to have spray adhesive on!)

- Carefully smooth down the rest of the photo, working from the center out to the edges. You may want to use a hard rubber roller (Micheals - Decoupage roller works well.)

- Then I used a few pieces of double-sided tape along the edges before I folded over the edges. (Like wrapping a present)
-Step 5: Apply tape around the edges
-  I wanted the tape to overlap the folded-over photo right along the top edge, and also wrap around the back edge

- The tape was not quite wide enough so I applied two on each side, starting the lower piece first. I put it about halfway down the side and around to the back. Then I applied the second strip on top carefully laying it right up to the top edge. I found that standing the foam board on one edge near a wall helped me to be able to carefully apply it.

Ready to hang!
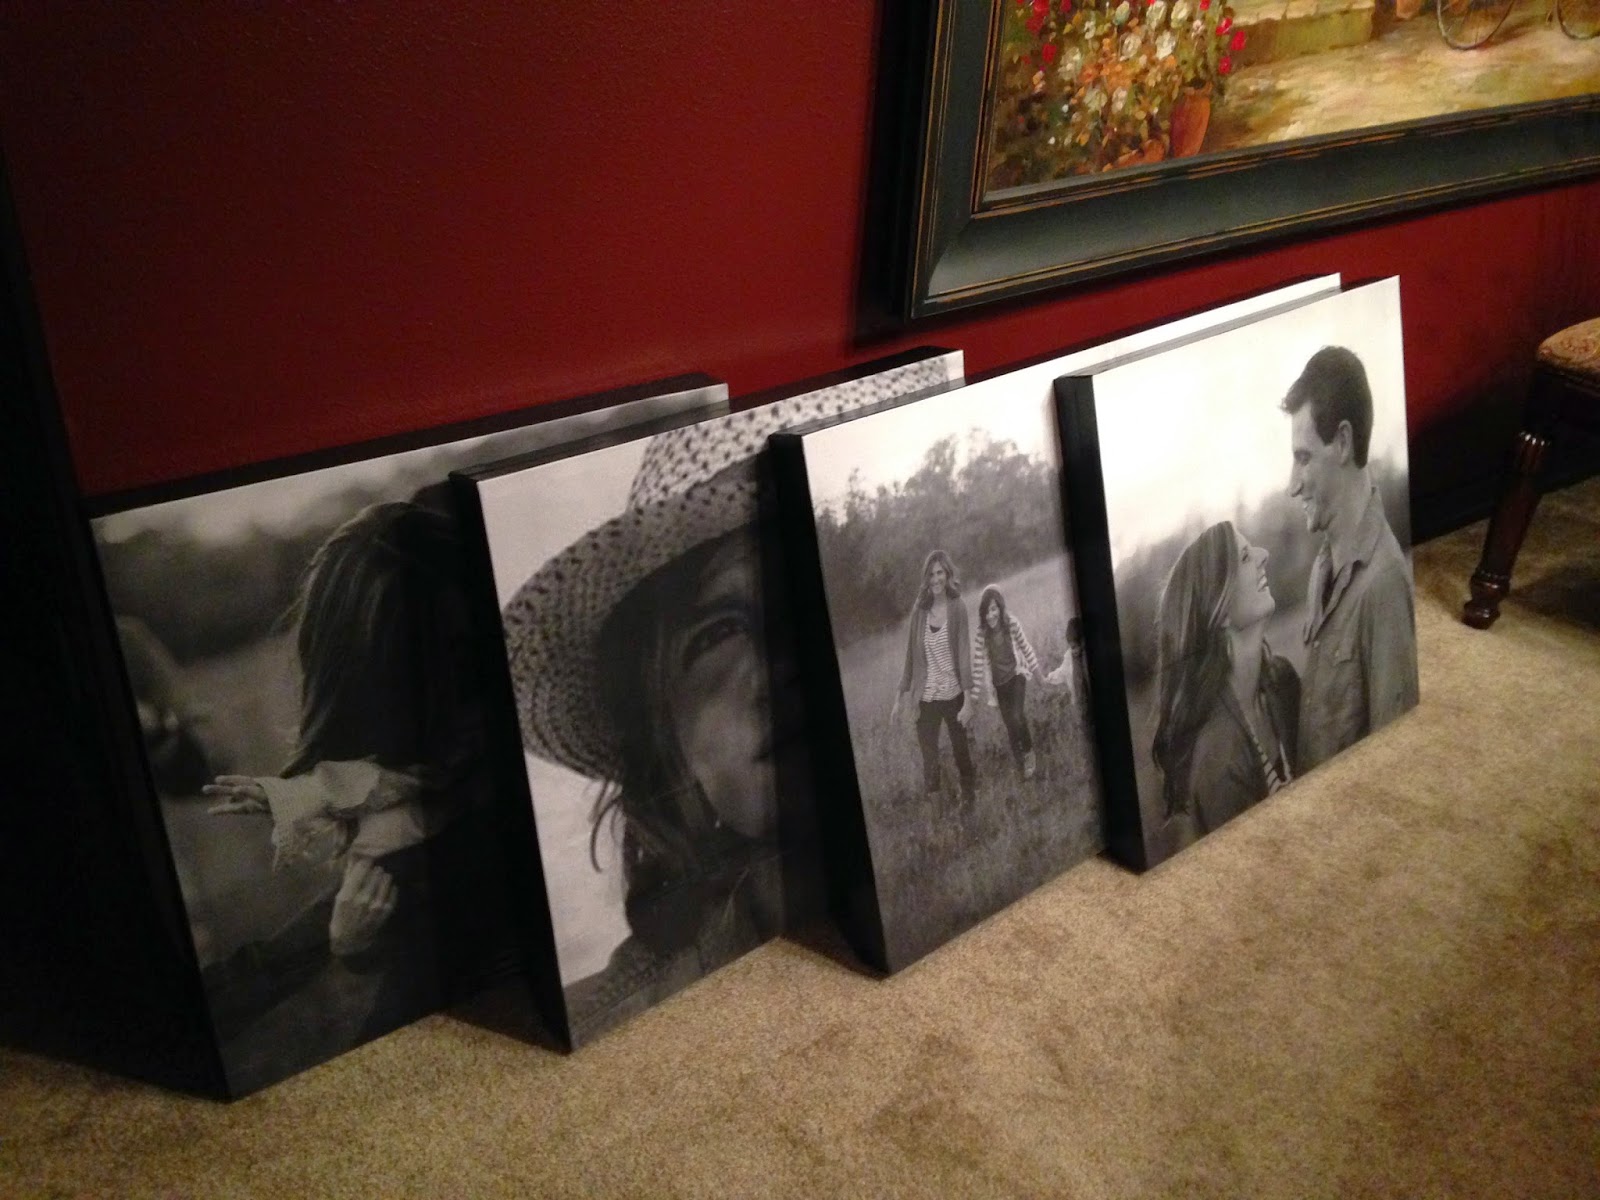
Step 5: Hang them on the wall
- I used industrial velcro to hang the photos on the wall. We started with the lowest center photo and worked our way up and out, using the width of a 2" level as our guide between photos. Note: we marked a center point on the wall between the corner and the bookcase - but we ended up with an optical illusion  - they looked WAY closer to the corner than the bookcase. Sooooo . . . we took them down and redid it just by "eye-balling it." Be sure to test it out before handing them all up!

TA-DA!!!!


Thursday, September 11, 2014

Making a Memory - Kaleigh's Wall

We had a wonderful time in North Carolina last week at our son and daughter-in-law's new home - and it was fun to tackle a few projects. Kaleigh wanted a design on her newly painted aqua walls. After a lot of discussion and lots of options, she settled on  using the design on her new comforter as inspiration.

Kaleigh's Inspiration:

My challenge was that it was a chevron - more geometric than my usual free-flowing style! Soooo . . . her dad and grandpa Bob came to the rescue - saving me from a high stress level by offering to measure and tape the outline for me! Whew! Thank heaven for those who actually enjoy measuring!

Dad & Grandpa to the "measuring rescue."
A few details:
We decided the highest points would be 3' from the baseboard and used little pieces of tape to help mark it. Using a 2' level we made dots with a pencil along the wall.

Then we decided how "steep" we wanted our angle by placing a small piece of tape between our top points. Again, we used the level to mark the low points of the chevron centered between the high points. We used painter's tape to connect the dots and provide with our outline.

Learning to roll it!

Then Kaleigh and I had freedom within the parameters to add her favorite colors. We had chosen sample colors from Lowe's for this project, and used painter's tape and a small roller for the larger stripes. It was fun to make a memory!

Painting with Grandma


Ta-da!


Tuesday, August 19, 2014

"Maximizing!"

This week I've been helping my daughter-in-law Carey with her new office. I'd have to say that one of my absolute FAVORITE things to do is to help someone create a "comfortable environment" that is a delight to the eye! I love listening to their ideas and looking at photos that catch their eye. Then comes the fun . . . looking for things to re-create "the look!"

According to StrengthsFinder 2.0, a Maximizer loves to "see potential in something or someone and draw it out" . . . Maximizing is one of my highest strengths. As a coach I love seeing potential in leaders and emerging leaders and drawing out the best in them. And as a designer I'm having so much fun "maximizing" basement, attic, and thrift store finds! I can just see the wonderful potential locked up inside a piece - and all the possibilities for giving it new life.

Today's project was to deepen the wood color on two chairs she found in one of the rooms at church so they have a bit more contrast.

BEFORE:


Used a little Annie Sloan Chalk Paint (Graphite), sanded some  details, and finished with some dark wax.

AFTER:


Stay tuned for more office creations!!!

Monday, August 11, 2014

Change it up with Color

I like variety. Changing up our home environment satisfies my need for change and brings me joy! I've found that a splash of new color lifts my spirits and brightens my day.

Early on in my decorating adventures I made the mistake of using color on expensive elements - carpet, large upholstered pieces, etc. But then I'd be "stuck " with that color for years! Finally I realized that if I kept my larger, expensive pieces more neutral, I could switch out smaller accents and change the whole tenor of the room in a matter of minutes. (Pillows, afghans, photo mats, etc. that I store in seasonal bins in the basement) Boy do I wish I had thought of that 30 years ago!

Here's a peek at our family room in several seasons.
#dodfamily room

Winter Reds:


Spring & Summer Blues:


Fall Oranges:


Sunday, August 10, 2014

A Lesson in Contrast

Earlier this summer I wanted to spruce up one of our guest rooms before my Maurer boys arrived for their visit. I liked each piece of furniture and the room in general, but it was just missing something. Chalk paint to the rescue! A coat of Antique White, a little sanding on the edges follow by some clear wax . . .

Added a couple nautical accents - and we're good to go!
#dodbedrooms

Saturday, August 9, 2014

Adopted Table

I spotted this table last week, and all I could see was potential. Before I knew it I'd gone back with the van and brought it home. I thought it would be an inspiring table to use in my studio once I applied a little TLC.

Out came my Annie Sloan chalk paint  .  . . a wash of Graphite followed by some dark wax on top and some Provence dry-brushed on the base and legs . . . a little clear wax and I think we're good to go!

I plan to give my current studio table (farm-style table) to my daughter-in-law to use as a desk in her new office - when I do, I'll post a picture of this beauty in my studio! #dodchalkpaint